
Multiple Output Models with TensorFlow’s Functional API for Energy Efficiency

In the previous article, we explored the Functional API and how it gives you the flexibility to build models with more complex architectures. While the Sequential API can only create simple stacks of layers, the Functional API allows for branching paths, shared layers, and multiple inputs and outputs. This article focuses on a real-world application of the Functional API: multi-output models.
The article will show in code how to build and train a complete model using the Energy Efficiency Dataset from the UCI repository, which contains 8 input features and 2 target outputs, making it a perfect candidate for a multi-output model. The study that originated the dataset (https://archive.ics.uci.edu/dataset/242/energy+efficiency), looked into assessing the heating load and cooling load requirements (labels Y1 ad Y2) of buildings (that is, energy efficiency) as a function of building parameters such glazing area, glazing area distribution, or orientation (features).
By the end of this article, you’ll understand:
- Why multi-output models are necessary.
- How to build a model with multiple outputs with TensorFlow’s Functional API.
- How to load, train, and test this model with real data.
Why Multiple Outputs?
The models created with the Sequential API take one input and produce one output. But in the real world, you might encounter cases where either multiple inputs or multiple outputs are required. For example, for predicting house prices both numerical features (like square footage or orientation) and images are necessary, which means that the model must accept two inputs. Another example is the one that will be solved in this article: from features related to a building’s energy efficiency, both the heating and cooling load requirements are predicted, which means that the model must output two values.
These problems, which were impossible to solve by using the Sequential API, can be approached by using the Functional API. As explained in the previous article, when using the Functional API layers are linked by calling instances of layers with the outputs of other layers. As the model that is required for the Energy Efficiency problem must output two values, it will be necessary to define two output layers, whose instances will be called with the output of the neural network’s last layer (last layer before the split), that is, the output of the non-split neural network will be linked to the input of each of the output layers.
Even though it might seem a bit difficult to understand the links between al these layers, visualizing these links in code will help. In order to explain this in a clear and helpful way, the code implementation of the multi-output model will be explained and shown in the next section.
Building and Training the Multi-Output Model
Load and Preprocess the Data
As mentioned in the introduction, the Energy Efficiency Dataset from the UCI repository will be used, which contains 8 input features and 2 target outputs. Instead of building two separate models for Y1 and Y2, a single model with two output branches will be created.
In the following code the Energy Efficiency Dataset is loaded, then the features and target values are extracted from this data, and finally the data is normalized and split into training and testing data.
import pandas as pd
from sklearn.model_selection import train_test_split

# Load and preprocess the Energy Efficiency Dataset
url = 'https://archive.ics.uci.edu/ml/machine-learning-databases/00242/ENB2012_data.xlsx'
df = pd.read_excel(url)

# Split the training features from the targets
X = df.iloc[:, :-2].values
y1 = df.iloc[:, -2].values
y2 = df.iloc[:, -1].values

# Normalize data
X = (X - X.mean(axis=0)) / X.std(axis=0)
y1 = (y1 - y1.mean()) / y1.std()
y2 = (y2 - y2.mean()) / y2.std()

# Split data into training and testing sets
X_train, X_test, y1_train, y1_test, y2_train, y2_test = train_test_split(X, y1, y2, test_size=0.2, random_state=42)
Define the Model with TensorFlow's Functional API
The code below shows how to create a multi-output model using TensorFlow’s Functional API. As explained in the previous article, constructing a model with the Functional API requires 3 components: the input, the layers and finally the model. Because of this, the first three things that the code does is defining the input of the model, defining the hidden layers and defining the model.
The explanation of how to implement in code the definitions of the input, layers and model is available previous article. There is, however, some minor changes between this code and the one presented in the previous article:
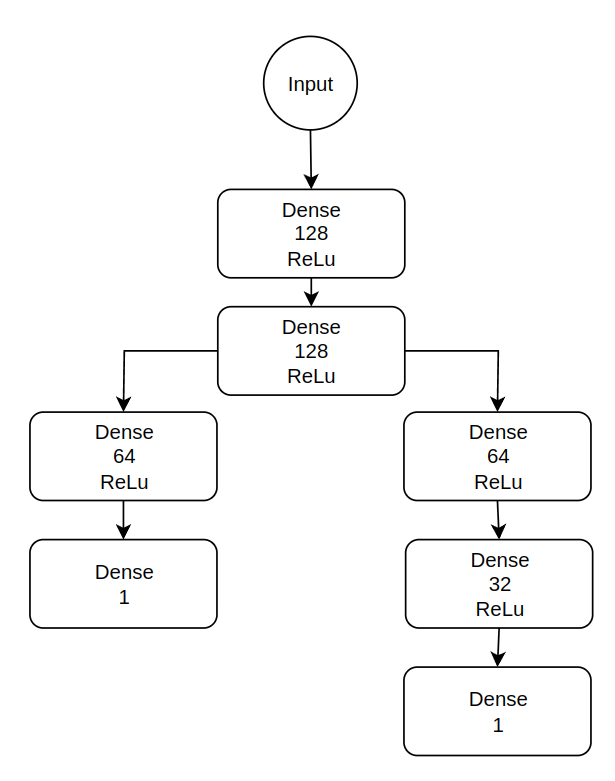
- As this is a multi-output model, the layer tree is split into two branches, with each branch generating one output. This is coded in layers y1_path and y2_path, where both layers take as input the output of the second Dense layer. By doing this, two different layers are being fed with the output of a single layer, which means that the layer tree has been split in two.
- When defining the model, while for single-output models the argument outputs of the keras.models.Model class receives the instance of a single layer, when building multi-output models the argument outputs receives a list of layer instances, with each element being each of the output layers of the model.
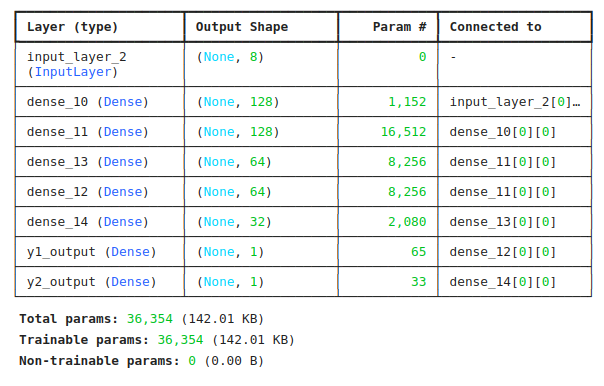
A diagram of the neural network structure, followed by the summary of the model, are shown in the figures below.
Note that none of the output functions are using an activation function. This is because both branches of the network are working on a regression problem, which requires the outputs to be any real number. For example, using ReLu would imply that all negative outputs are converted to a 0, and using sigmoid or tanh would imply that the outputs are in the [0, 1] and [-1, 1] ranges, respectively.
from tensorflow.keras.layers import Input, Dense
from tensorflow.keras.models import Model

# Define the input layer
input_shape = X.shape[1]
inputs = Input(shape=(input_shape,))  # 8 input features

# Define shared hidden layers
x = Dense(128, activation='relu')(inputs)
x = Dense(128, activation='relu')(x)

# Split the network into two paths
# Path for Y1
y1_path = Dense(64, activation='relu')(x)
y1_output = Dense(1, name='y1_output')(y1_path)

# Path for Y2
y2_path = Dense(64, activation='relu')(x)
y2_path = Dense(32, activation='relu')(y2_path)
y2_output = Dense(1, name='y2_output')(y2_path)

# Create the model
model = Model(inputs=inputs, outputs=[y1_output, y2_output])

model.summary()
Compile the Model
The compilation of the model is slightly different when working with multi-output models. This makes sense, since having two different values to be predicted by a single neural network will require to define which will be the error function to use for each of the outputs, and which metrics to show for each output.
As can be seen in the code, the declaration of the metrics and error functions for each output can be done using a dictionary, where keys are the names of the output layers and the values are the error functions/metrics to be used. In this article the mean squared error (mse) is used as the error function and metric for output 1, and the mean absolute error (mae) for output 2.
# Compile the model (using Mean Squared Error for both Y1 and Y2)
model.compile(optimizer='adam',
              loss={'y1_output': 'mse', 'y2_output': 'mse'},
              metrics={'y1_output': 'mae', 'y2_output': 'mae'})
Train and Evaluate the Model
The model.fit method also differs from the one coded in the previous article. This time the model needs two labels for each data sample, which means that the model.fit method will not receive only one array of labels, but two. As for the model.compile method, the labels can be passed to the fit method by using a dictionary where output layer names are used as keys and the corresponding labels are the values.
# Train the model
history = model.fit(X_train, {'y1_output': y1_train, 'y2_output': y2_train},
                    epochs=50,
                    batch_size=32,
                    validation_split=0.2)

# Evaluate the model
results = model.evaluate(X_test, {'y1_output': y1_test, 'y2_output': y2_test})
print(f"\nTest Results: Y1 Loss: {results[1]:.4f}, Y2 Loss: {results[2]:.4f}")
After training the model, the only difference with respect to training a single output model is that at each epoch during training, as well as when evaluating the model on the validation or test data, the values of the selected error function and metrics will be obtained for each output layer, instead of receiving a single value for each metric (see below how the results after evaluating the trained model on the test data show the mean squared error for output 1 (y1_output) and the mean absolute error for output 2 (y2_output).
Summary
This article introduces the construction of multi-output models using TensorFlow’s Functional API, highlighting its flexibility compared to the Sequential API. Using the Energy Efficiency Dataset as an example, the article demonstrates how to create a model with 8 input features and 2 output targets. The model has a shared path of hidden layers that splits into two branches, each predicting a separate output. Key steps, including data preparation, model design, training, and evaluation, are explained in detail. By optimizing for multiple outputs simultaneously, the approach improves efficiency and demonstrates the power of the Functional API for multi-objective learning.
Huge thanks for reading the article! I hope this article may have helped you to better understand and use tensorflow’s Functional API, and how to use it to construct models with multiple outputs.
